

Serial Port Receivers
|
The following page will show you how to build your own infrared receiver for the serial port. Please note that the serial port driver in the LIRC package only supports 8250 compatible UARTs (this includes the most common 16450 and 16550A types). That means that it won't work with exotic multi-port cards that need a special driver. From my own experience, the hardest thing in building your receiver hardware is getting a suitable infrared receiver IC. Hence, here is a list of ICs that have been successfully used to build a serial port receiver. But be aware that not all of them have the same pin-out!
Most of these receivers come in variations adapted to a specific carrier frequency. You should choose the 38kHz types because most remote control standards use this frequency. 36kHz types should work as well. The receiver won't stop working if your remote uses another frequency but the range will decrease. If in doubt which IR receiver type to choose you should read this more detailed description on how IR receivers work internally. There are also some brands that use 56kHz carrier frequency. A 38kHz receiver should still work to create a config file for these kinds of remotes at short range but if you plan to use them regularly you should use a 56kHz receiver. Bang & Olufsen uses 455kHz for their remotes so you will need a matching receiver. 38kHz or 56kHz receivers won't work. Some HiFi components also have a remote control output which carries the IR signal at TTL level. If you plan to integrate your computer into the HiFi rack, you might be able to reuse this output instead of using a dedicated receiver. Additionally to the receiver you will need the following parts:
The pin-out of the voltage regulator usually looks like this (bottom view):
   1 2 3
  _______
 /       \      Pin1 = OUT
(  o o o  )     Pin2 = GND
 \       /      Pin3 = IN
   -___-
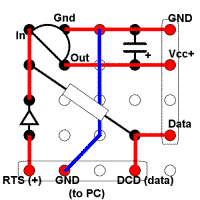
But you should check the data sheet anyway to make sure you have the same type of regulator that is used here. Finally we come to the circuit itself. It's rather simple and can be explained in a few words. Here's also a nicer version of the ASCII arts below. There's also a suggestion how to layout the circuit on a 5x5 hole-matrix board. The connector pins on the data-to-PC are designed to use a standard CD-ROM audio cables, but of course it's not necessary to use one.
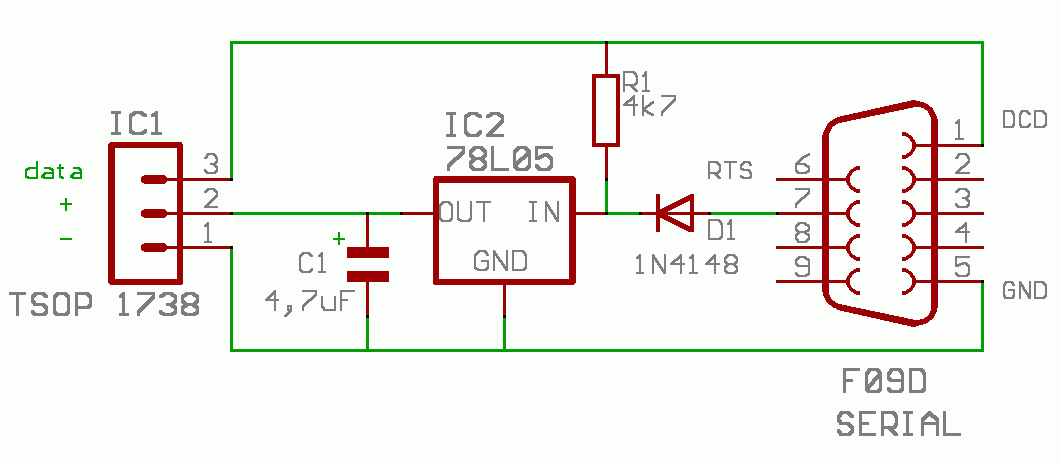
 IC1 = TSOP 1738
+-----------------------+ 3                           R1 (4k7)
|               data -> +--------------------------------+------------o DCD
|                       |                 _______        |
|      ______________   |                | 78L05 |      | |   D1 (1N4148)
|     /                 |    +-----+-----|OUT  IN|--+   | |
|    (                  | 2  |     | +   |__GND__|  |    |      | /|
|     \______________ + +----+   -----       |      +----+------|< |--o RTS
|                       |        -----       | IC2              | \|
|                       | 1        |         |
|                     - +----------+---------+------------------------o GND
+-----------------------+      C1 (4.7µF)
The power for the circuit comes from the RTS line of the serial port. D1 protects the circuit from the negative voltage that is usually on the RTS pin. The LIRC driver will change the serial port settings on initialization so that the circuit will get the necessary positive voltage. For most standard PC serial ports this will be approximately 10V. IC2 will convert the input voltage to exactly 5V. As the input voltage for the 78Lxx type regulators has to be at least 2V higher than the output voltage to work reliably, this circuit probably won't work on some notebooks. The line drivers inside notebooks often provide voltages about 6V or even less. So you should make sure that your serial port delivers at least 8V of output voltage. If your serial port provides less you can also try using a low-drop voltage regulator (e.g. LP 2950 CZ) instead of the regulator suggested here. Low-drop types need much less voltage offset for reliable regulation. Instead of pulling the power supply from the serial port you can also use a different source like e.g. the USB port or the internal 5V line to power the circuit. Then you won't need a voltage regulator at all. C1 is optional but I recommend using it anyway. R1 is a pull-up that makes sure the DCD line is on a valid voltage level if the receiver does not receive anything. When an infrared signal is detected IC1 (this is true for active low receivers, if you use an active high receiver leave away R1 or make it a pull-down to GND) pulls DCD down to ground, which should already be interpreted as a logical "1" (DCD=0) by the serial port. It should be noted that the circuit described above does not fully comply to the RS232 standard as latter demands a voltage swing of at least -3V/3V for the signals. This circuit will provide approximately 0V/5V which the majority of serial ports will also accept. If you have problems with this circuit or want to use it on a serial port that does not provide enough voltage for the regulator, you should use the more advanced circuit (PCB layout) suggested by Thomas Breuer in this mailing list post. This circuit addresses both problems but will need some additional parts. Here is a small overview of the most important pins of standard 9-pin and 25-pin SUB-D serial port connectors:
Name        25-pin         9-pin
---------------------------------------------------------
TxD           2             3       transmit data
RxD           3             2       receive data
RTS           4             7       request to send (here: power source)
CTS           5             8       clear to send
DSR           6             6       data set ready
GND           7             5       ground
DCD           8             1       data carrier detect (here: signal line)
DTR          20             4       data terminal ready
The following pictures were taken from the lirc-0.3.6 package with kind permission of its author, Ralph Metzler. They show the receiver build into a SUB-D hood. The original circuit used resistors to get the 5V voltage but as this caused problems for many people it shouldn't be used anymore. Andreas Nestler came up with a nice idea for a receiver casing. He assembled the infrared receiver inside an old mouse. Note that he had to replace the old mouse plug because not all the necessary signals were passed through. Here's a highlight for all Star Wars fans: Petri Damstén built his receiver inside a TIE fighter model. |